Latest Windows 10 update now allows users to customize Start Menu to add or remove folders for quick access. As you might have known that Windows 10 Start Menu is different from what it used to be in previous Windows versions. On the right side is a collection of live tiles that display updated information about the app. On the left side you can now add folders such as Documents, Downloads, Pictures, or any other frequently used folder for quickly accessing them straight from the Start Menu. In this guide, we are going to walk you through the process of how to select which folders should appear on the left rail on the Start menu for easy access.
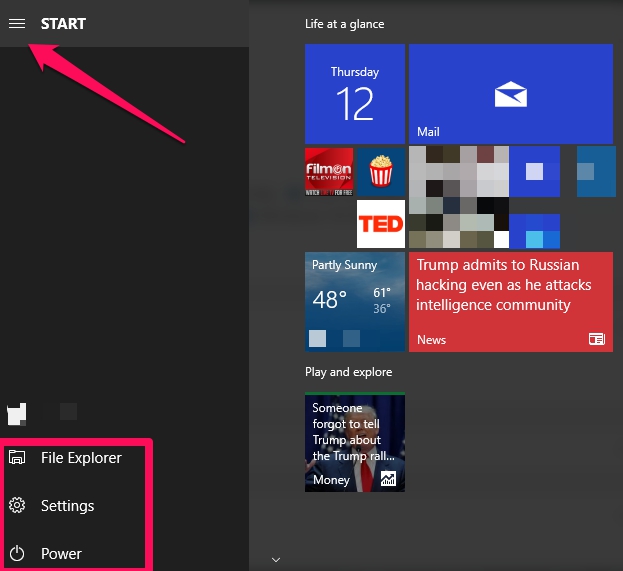
Windows 10 Start menu now displays live tiles of apps that give a glimpse of latest changes in the apps. On the right side, you see there is a list of all apps installed on your Windows 10 PC, laptop, or tablet. And now there is new rail on the left side of the all apps list on the Start Menu, which by default includes the users profile menu, quick access, power options, and the Settings app. You can expand this left rail to see more information about the shortcut to frequently used folders.
Microsoft now allows you to add folders on to that left rail for quick access. You might be wondering if creating a quick access is the goal, then why not create a desktop shortcut of that folder. Well, you can, but then again having too many desktop shortcuts slows down the PC startup. More desktop shortcuts of apps, programs and folders means it takes Windows 10 more time to load those items at startup. Moreover, it gives a cluttered look to the desktop. So, if you wish to keep startup time fast, and like a clean looking desktop, Windows 10 now allows you to achieve that by adding frequently used folders on the left rail of the Start menu for quick and easy access.
Moreover, you can add and remove folders in the left rail on the Start menu. Here are the steps to select which folder to appear in the left rail on the Start menu of Windows 10. It’s really simple, lets see the steps in the process.
How To Select Which Folder Should Show On Start Menu:
1 – Open Settings app.
2 – Click on Personalization option.
3 – Now, click on Start on the left-pane of the settings window.
4 – Next, click on the Choose which folders appear on Start link.
5 – Here you will see a list of folders which you can add or remove from the left rail on the Start menu. Remember this option allows you to add or remove only system folders, including File Explorer, Settings, Documents, Downloads, Music, Pictures, Videos, HownGroup, Network, and Personal folder. This is a default list of system folders which you can choose to add or remove in the left rail of the Start menu for quick access.
6 – Simply turn to the toggle next to the folder you wish to add or remove on/off add or remove it from the left rail on the start menu.
7 – All done.
Now click on the Start button to see a list of newly added or removed folders in the left rail. You can click on the menu button on the top-left corner of the Start menu to expand this list to see complete names of each folder.
Don’t forget to leave your feedback, if you found this Windows 10 Trick useful in the comments section below.
For More on Apps For Windows 10, See:
How To Fix Keyboard Not Responding In Edge Browser & Start Menu On Windows 10
How To Fix Start Menu and Cortana Not Working Error in Windows 10
Enable Legacy Advanced Boot Menu in Windows 10/8/8.1 to Install Compatible Driver Software
How To Fix Device Manager Error Code 32 In Windows