Microsoft Aliases allows users to add multiplayer email accounts on Outlook.com on a single device. If you are looking for a guide to add and use more than one email addresses, for work and personal use, on Outlook.com server, then this is the place for you.

In one of the recent updates, Microsoft’s Outlook.com service brought in the ability to add multiple aliases email accounts and manage them from one place. These additional email addresses can be used side-by-side along with your primary email account.
This feature has many uses. For instance, having multiple Aliases enables you to keep personal and work email addresses separate, when you wish to change your email address, or want to protect primary work related email from unauthorized access. Moreover, you can also add emails from other services such as Gmail, Yahoo, and others.
When you setup multiple Aliases, it merges all emails so that they can use a single inbox where you can easily access all your emails without having to switch between email accounts. Further, it also joins contact lists and account settings to ensure easy navigation and email management. You can login to your Outlook.com account using any alias and its password – this option can be changes from settings though if you want to keep signing in with separate email and password for each account.
In this guide, you will learn the steps required to create a new alias on your Outlook.com account.
How to Set up a new Alias on Outlook.com
Follow the instructions below to create a new Alias on Outlook.com.
1 – Launch a web browser on your device.
2 – Sign-in with your account, if not already logged in.
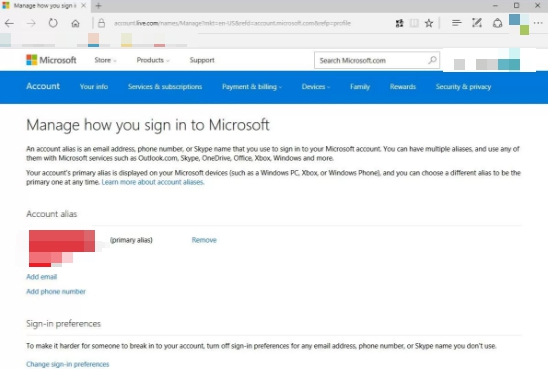
3 – Click on Add email link.
4 – Select if you want to set up a new Alias – a new Outlook.com name. Or check the other option to add an existing email address for another service as an Outlook.com alias.
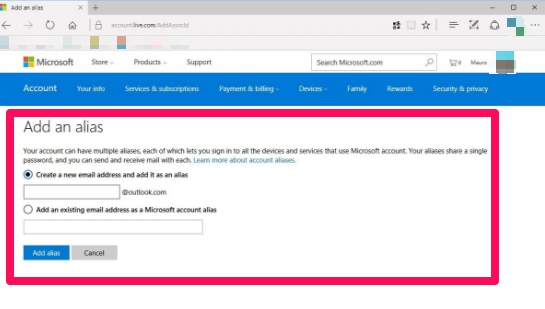 5 – Click the Add alias button when done.
6 – If you are using an existing email address, click on the Verify link and follow on-screen instructions to confirm that the newly added account is in your use and you want to add it to alias.
7 – All done.
Once new alias has been added to your Microsoft account, it can be used to sign to your account. Only aspect you should keep in mind, because aliases use the same personal information you configured for your account, it cannot be hidden by using a nickname or short form to protect your identity when alias is being shared with someone else.
Moreover, in case you are adding a new alias, you will be asked if you want to designate newly creates alias as your primary account or remove the one already setup as primary account, and verify the address if you are using an email from another (non-Microsoft) service.
Alias are configured on your Microsoft account, meaning they also have an effect on your Windows 10 account and services, such as Xbox, Skype, Office, OneDriver, etc. Here is a guide on how to create and manage aliases on Microsoft account.