Windows update history check has become lot more easy in the latest Windows 10 OS than in any other previous version of the operating system from Microsoft. In this post you can learn a quick and easy way to view Windows 10 update history to see which update is installed on your device. This helps in identifying a faulty update which causing performance issues on your device after the installation as well as to keep track of what’s being installed on your computer/laptop.
Windows 10 has a dedicated settings page that lets users see a list of update history installed on computer. This is to help Windows 10 users check whether new updates have been installed properly or not. It also makes it easy to find out after which update your system started acting out and needs uninstalling to get PC back to stable working condition. Windows 10 Update history check features is there to help you to know everything regarding Windows updates.
In this tutorial, we are going to walk you through the process of Windows 10 update history using two methods: the Settings app and the other one is by Command Prompt.
How to See Windows 10 Update History from Settings App
1 – Go to Settings.
2 – Click on Update & Security.
3 – Click on Windows Update.
4 – Click the Update history link just under the Check for updates button.
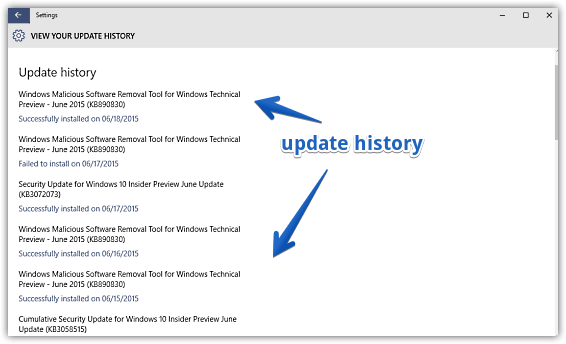
5 – Now on the Update History window, you will see a list of most recently installed updates with update number and date of installation along with installation status to indicate whether the update has been installed properly or not.
6 – To get a brief overview of each update, click on a More info link for the update and check every items that came with that particular update.
7 – That’s all.
Now if your device has started behaving strangely since the installation of a new update or restoration of an older update, you can find which particular update is causing the problem from this update settings page. Simply locate the faulty update and click the Uninstall updates link go to the Control Panel page for removing that update.
How to Check Windows 10 Update History from Command Prompt
Perform the following steps to check Windows 10 update history using Command Prompt.
1 – Click on Start button on the taskbar.
2 – Type Command Prompt and click the result.
3 – Type the following command in the prompt to see a complete list of Windows update history:
wmic qfc list
Note: To find information regarding a specific update, type the command in the format shown below and hit enter key:
wmic qfc | find “971033”
4 – You will now see a list of Windows updates on the command prompt window with a link next to each one that takes you to the Windows support website showing complete detail about that update number. It will show you the update installation date, description, hotfixid (KB number) and other information.
5 – All done.
Now, if you want to get rid of an Windows 10 Update from Command Prompt, you can do so by typing its KB number and enter this command wusa /uninstall /kb:971033 /quiet. Don’t forget to change the KB number in the command to uninstall that specific command.