In this guide we are going to show you how to clean boot Windows 10, Windows 7, Windows 8 / 8.1 desktop PC and laptop. Clean boot in Windows is one of the most useful features that helps users to identify problems on their PC. Windows Clean Boot also makes troubleshoot more effective since it doesn’t require scanning unnecessary program while trying to find problem on your PC such as Blue Screen of Death (BSOD) and similar other errors. Many Windows 10, 7, 8, 8.1 users are familiar with Booting process. When you start your PC, it loads some third-party apps, software, services and items at startup. However, when your clean boot on Windows, PC doesn’t load third-party programs and services during PC startup. This makes it easy to diagnose problem in Windows and makes troubleshooting process faster.
Windows Clean Boot is required in cases when you have been repeatedly facing recurring Windows errors and problems. In most cases, faulty third-party apps and software are the main reasons behind advanced errors in Windows. With Windows Clean Boot you’ll be able to fix any issue that’s causing errors on your PC, as well as identifies the exact source of problem by highlighting malicious apps, programs or services. All you need is to follow some simple steps to perform the clean boot in Windows 10 / 7 / 8 / 8.1 and the rest will be taken care of by the Clean Boot process itself.
Clean Boot fixes Windows errors automatically. Mostly, it acts as a life saver if your Windows copy is effected by blue screen of death problem, or some other error that makes it impossible to use Windows PC. See the steps in the guide below run clean boot on Windows PC.
Steps To Clean Boot Windows 10/7/8/8.1 PC
Now that you get a clearer picture of how clean booting Windows PC can be of help to you, its time that you also know how to perform this simple yet very important process to solve any major issues in your Windows copy. The process works on Windows 7, 10, 8, 8.1 and older versions of Windows OS.
Step 1 – First of all, you need to open the RUN dialogue box. For that, press Windows Key + R on the keyboard.
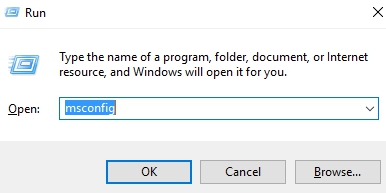
Step 2 – In the RUN box, type msconfig and hit enter.
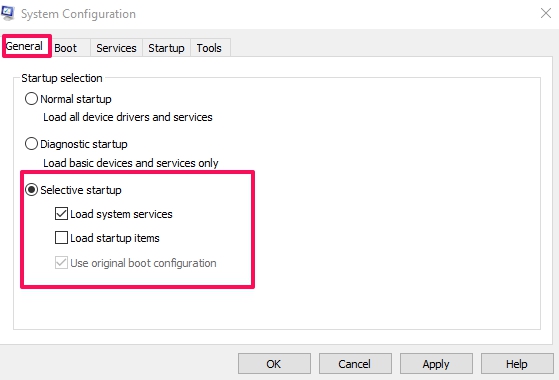
Step 3 – In the system Configuration window, under General tab, there’s an Selective Startup option. Below the ‘Selective Startup’, make sure Load system services and Use original boot configuration options are enabled, if not then check them, and uncheck/disable Load startup items option.
Step 4 – Now you need to disable third-party services. To do so, click on Services tab.
Step 5 – Here, you’ll see Hide all Microsoft services option below the Service box and check the box next to the option.
Step 6 – Now click on Disable all button.
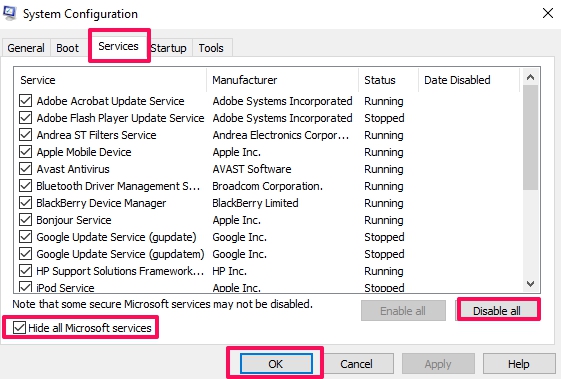
Step 7 – Click OK and restart your PC.
This will boot your Windows PC in clean boot state. It should fix the problem on your device. But if the issue remains, uncheck the load system services option in the Step-3 above, hit OK button and restart PC to see if that solves the problem.
Let us know if the solution worked for you in the comments section. Also, share where you’ve been getting errors, we’ll try our best to come up with a solution.
For more on AppsforWindows10, Read:
Enable Advanced Boot Menu in Windows 10, 8 and 8.1 [LEGACY]
How to Dual-Boot OS X and Windows 10 on Mac
How to Dual Boot Windows 7 with Windows 10 on One PC