Windows 10 allows you to delete previous version of the operating system from which you upgraded to the latest one in order to free up disk space for important files and data. In this tutorial, we are going to show you two methods to free up disk space on Windows 10 by deleting a previous Windows version from your computer. If you recently upgraded to the Windows 10 Fall Creators Update, you can use this tutorial to delete a previous Windows 10 version to recover disk space since the older version won’t be of any use to you, moreover, it’s unlikely that Microsoft will keep on supporting versions older the Creators Update in the coming months.
On Windows 10, when you install a new version of the OS, it makes a copy of the previous installation in case something goes wrong during the installation process and you are required to downgrade to previous version.
However, even if the new upgrade works without any issue on your device, Windows 10 still keeps a backup copy of the older update in the Windows.old folder, which takes up a large space on hard disk.
Although the previous version deletes automatically after 10 days, but if you need space before that for important work or personal files, you can quickly free up space using two simple methods starting from the Windows 10 Fall Creators Update.
In the tutorial below, we are going to show you two methods to delete the previous version of Windows 10 to free up storage space on your desktop, laptop or Surface Pro device from the Settings app.
Delete a Previous Version of Windows 10 using Temporary Files:
1 – Go to Settings > System > Storage.
2 – Under ‘Local Storage, click the C: drive.
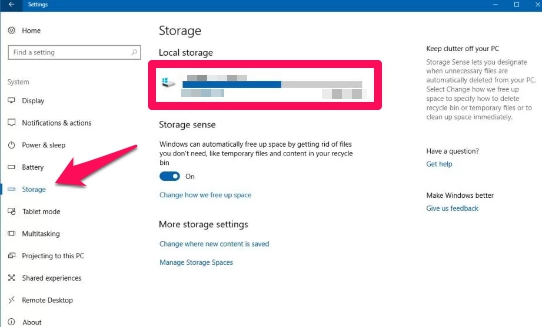
3 – Now click on the Temporary files option.
4 – Check the Previous version of Windows option.
5 – Click the Remove files button.
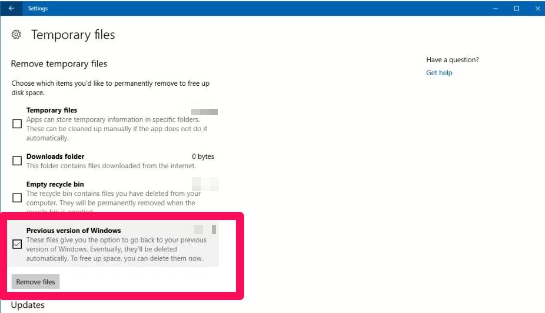
6 – That’s all.
This will remove the Windows.old folder from your computer freeing up several GB of disk space.
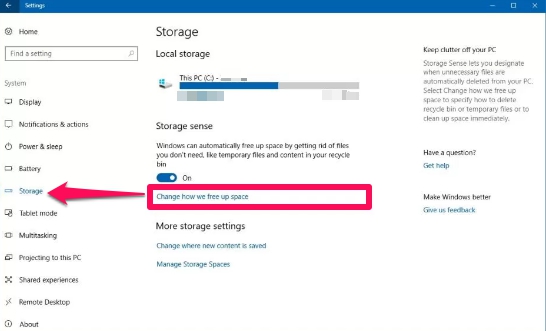
Delete a Previous Windows 10 Version using Storage Sense:
1 – Open Settings app.
2 – Navigate to System > Storage.
3 – Under ‘Storage sense’, click the Change how we free up space link.
4 – Check the Delete previous version of Windows option.
5 – Click the Clean now button.
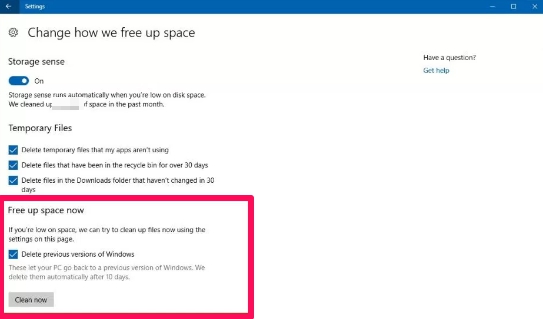
6 – All done.
This will delete the previous Windows 10 installation from your device to free up space. Do remember that by removing previous setup files will no longer allow you to restore them. However, Windows 10 deletes them automatically after 10 days anyway.
You can use utilities such as Disk Cleanup to delete a previous version of the operating system, but this Settings app method is more convenient and faster. If you don’t see this option to delete the previous version of the Windows 10, this means your device is not running Windows 10 Fall Creators Update. You need to first upgrade to the Creators Update to be able to use this new feature on your Windows 10 device.