As we all know that Microsoft’s latest OS Windows 10 has been launched for general public. It boasts a drastic improvement over catastrophic Windows 8 & Windows 8.1, Microsoft learnt from its mistakes in previous OS and improved upon a lot of stuff that went awry in the last iteration of its OS. One major plus in Windows 10 is its fast boot time, apps and programs open quickly and most importantly there are no annoying unexpected errors anymore. Another aspect of Windows 10 that is drawing plenty of attention and getting heaps of praises is Cortana search function, it’s voice search assistant using which you can look for app, programs or information over the internet within seconds. Windows 10 welcomes back much loved Start button which for some strange reason was taken off by Microsoft in Windows 8 & 8.1.
However, Windows 7 remains the most used Microsoft Windows OS to date and is still being used on millions of devices worldwide. If you have installed Windows 10 and want to enjoy all the latest features yet at the same time are looking for the familiar Windows 7 feels and appearance then you have come to the right place. This post will guide you through the process of giving your new Windows 10 copy an appearance of popular Windows 7. Note that not everything will duplicate the looks of Windows 7 but still many basic features can be modified to give them Windows 7 feel.
Start Menu
Let’s begin with the most popular feature of them all, the Start Menu. In Windows 10, Start Menu is different from that of Windows 7; on the right side you see live tiles of apps and on the left side there are recent & frequently used apps list which together consume considerable screen real estate. Some may not like this feature of Windows 10 Start Menu. However, there is a way of getting rid of all this and going back to Windows 7 like Start Menu but you will have to install third-party Windows 7 Start Menu apps for doing so.
After rigorous testing we decided that ‘Classic Shell’ is the best app to change the look of your Windows 10 Start Menu and give it Windows 7 Start Menu feel, moreover, it is also compatible with Windows 10. Download Classic Shell here. Make sure to download v4.2.2 or higher.
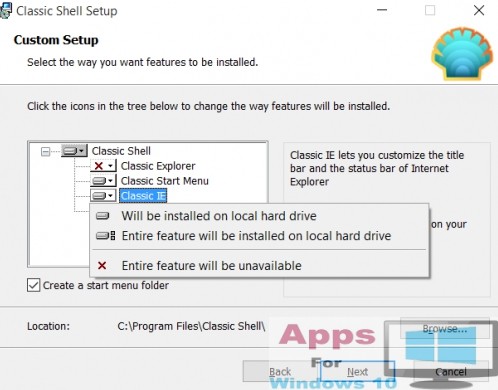
Select custom install option during Classic Shell setup process. Choose items you want to install and what items you want to skip during installation, we suggest you skip ‘Classic Explorer’ and ‘Classic IE’ as they don’t bring much to the table but it’s a matter of personal choice, do as you feel works best for you.
Next, after installing go to Classic Shell icon on task bar next to start menu, right-click on it and click ‘settings‘.

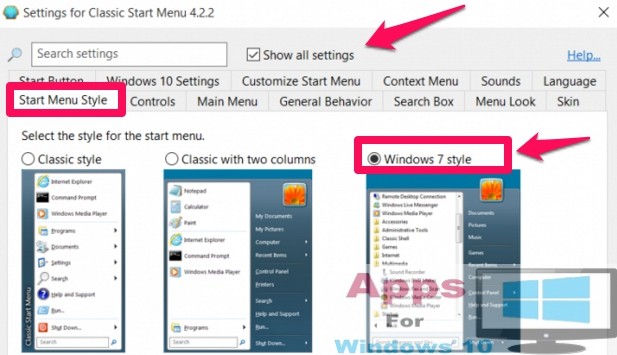
A new Classic Start Menu Settings window opens. Check ‘Show All Settings‘ box on the top of the settings window.
Click ‘Start Menu Style‘ and choose Windows 7 Style option.
There is a marked difference between Windows 7 and Windows 10 Start buttons, you can change the look of Windows 10 Start button by downloading Windows 7 Start button image here. To change the look of Start button, click Start Button tab in ‘Classic Shell settings’ window, check Custom Button option and browse the image to upload it from the location where you saved it on PC after downloading it from the link given above.

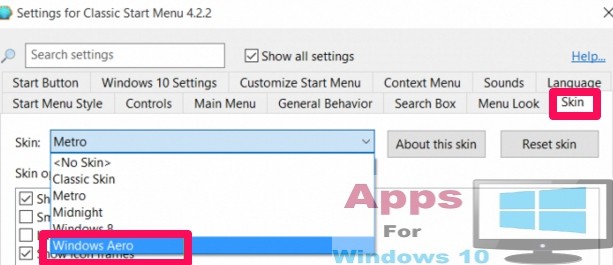
Now go to Skin tab and select Windows Aero option from the drop-down menu.
All done, just click OK for changes to take effect.
Windows 7 Wallpapers
After changing Windows 10 Start Menu to look like that of Windows 7, next step many want to do is to download Windows 7 wallpapers to give Windows an authentic look. Change desktop background by following instructions given in this link here.
There is another way of changing desktop appearance back to Windows 7 from existing Windows 10 look. Right-click on an empty space on desktop and select Personalized from the menu. It will open ‘Settings Personalization Window’. Click Browse to chose the custom wallpaper you saved on PC.

In the same Personalozation Settings windows select Colors option from the left-pane. Turn ‘Automatically pick an accent color from my background’ option off for choosing your own colors.
Internet Explorer
Although Microsoft Edge is a giant leap compared to Internet Explorer in terms of performance, we suggest you stick with Edge but still some die hard Windows 7 loyalists would want to revert to Internet Explorer to give a total Windows 7 feel to their PC Window 1o. Here’s how you can do it:
Unpin Microsoft Edge from the task bar by right-clicking on it and selecting Unpin from taskbar.
Search Internet Explorer in the Search bar. Right-click on Internet Explorer icon and select Pin to Start from drop-down menu. Open IE, click Internet Options from context menu, go to Programs tab and select Make Internet Explorer the default Browser. In Set Default Programs window, click set this program as default and finally hit OK.
Similarly, if you want to get rid of Cortana from task bar to give your PC even more authentic Windows 7 look then right-click on ‘Cortana Search bar’ and select Cortana from menu and choose hidden from sub-menu.
Remove Lock Screen
In windows 10 every time you start PC a new lock screen show up, which was not the case in Windows 7. This lock screen adds an extra step before you can actually use PC after starting or restarting PC. You can rid yourself of this extra step by following our instructions below.
To begin with, hit Windows Key + R to open Run window.
Type in regedit and press OK.

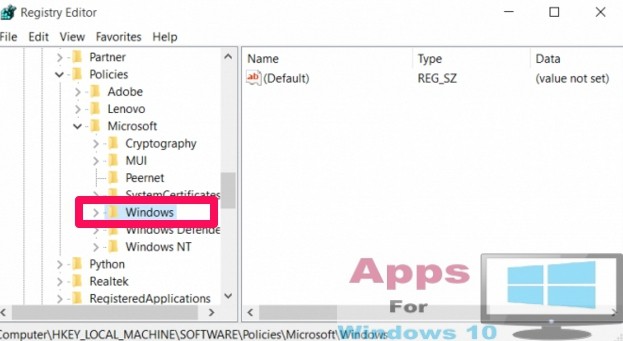
A new ‘Registry Editor’ Window opens. Navigate to Computer\HKEY_LOCAL_MACHINE\SOFTWARE\Policies\Microsoft\Windows on the left-pane.
Now right-click anywhere on an empty space on right pane and select Key > New.
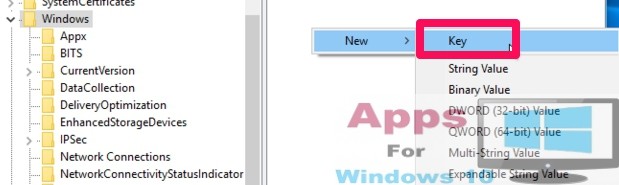
Rename the newly created folder to Personalization and select it.
Right-click on right pane and select DWORD (32-bit) Value > New.
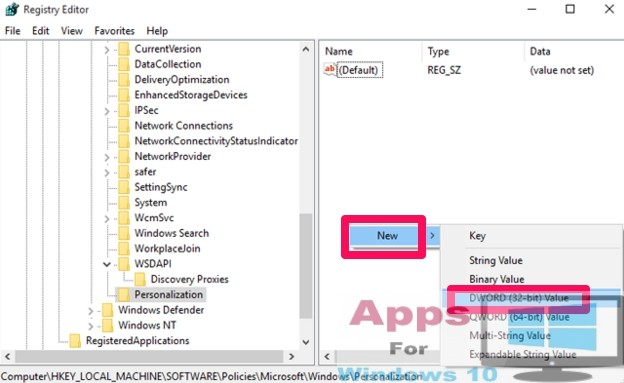
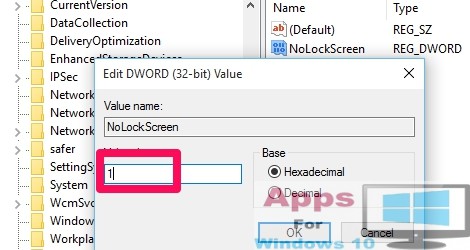
Rename the newly created value NoLockScreen and double click on it.

Enter 1 where it says ‘Value data’ in Edit DWORD (32bit) Value window and click OK.
There you go, you won’t see lock screen when starting Windows. If you want to enable lock screen option again, just type ‘0’ instead of ‘1’ by following the above method as it is.
All done. Enjoy your favorite Windows 7 looks all the while using latest Windows 10 functions and features on PCs and laptops.
For More, Read: Windows 10 Tips & Tricks & How to Make Windows 10 Theme