Cortana voice and text search assistant from Microsoft is the new feature which was introduced with the launch of Windows 10 OS. Microsoft doesn’t want users to disable Cortanta. This come pre-installed on all Windows 10 copies because Microsoft wants to direct all your offline and online searches on Windows PC via Cortana search assistant. Before you could simply turn off Cortana in Windows 10 but Microsoft has made some changes in its latest Windows 10 Anniversary update that has taken the option to toggle Cortana on or off. However, you can still easily disable Cortana on Windows, although after the Anniversary update you will have to follow a slightly different method to accomplish this task. Here we are going to show you how to disable Cortana on Windows 10 Anniversary update by using group policy settings or a registry hack option on your device. This will change reduce Cortana into a tool for searching just local apps and file searches on PC Windows.
Microsoft has made several changes to the use of Cortana in order to make it difficult for users to make changes to the underlying functionality of the search assistant tool on Windows. For example, you can no longer change default web browser on Cortana, it launches straight into Microsoft Edge and uses only Bing search engine to display search results because Microsoft wants users to use its own services. But if its something that doesn’t interest you then see the guide below to disable Cortana.
How To Disable Cortana via the Registry Editor on Windows 10 Home Edition
To make changes to Cortana function on Windows 10 home edition, users need to use the Windows registry editor. Windows 10 Pro or Enterprise users would be well served by using Group Policy Editor option instead to disable Cortana, see the second guide below for that.
Warning: Windows Registry Editor is a sensitive tool that deals with system files. So use and tinker with registry option with extreme care as we will not be responsible for any damage to your PC for inaccurate implementation of instructions on your part, however low the changes of making error using the guide below.
This guide is pretty simple, so changes of making any kind of error are low to none provided you stick to the instructions. You should also create a system restore point on Windows 10 PC, although Windows 10 Anniversary update automatically creates a system restore point, but you can also do so manually. This will make it easy to roll back to the previous working version of Windows 10 if anything goes wrong during the cortana disabling process.
Steps to Disbable Cortana on Windows 10 Home Edition
1 – Press Windows + R keys to open the Run Command prompt and type ‘regedit’ into the box and hit enter.
2 – On the Registry Editor window, navigate to the following location in the left sidebar:
HKEY_LOCAL_MACHINE\SOFTWARE\Policies\Microsoft\Windows\Windows Search
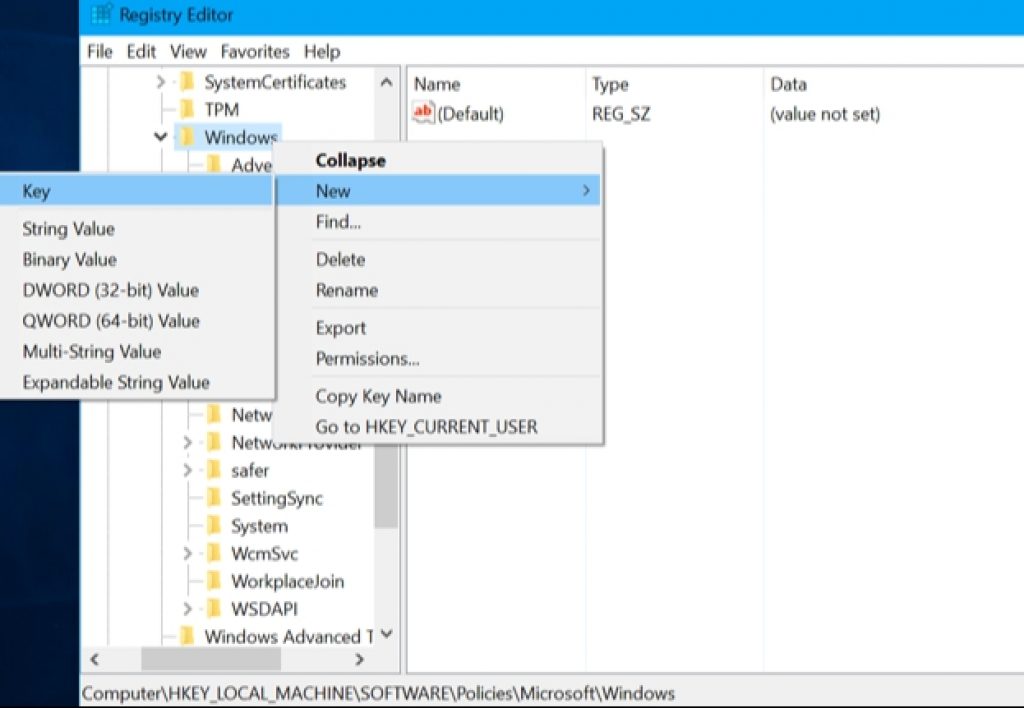
3 – If you don’t see the ‘Windows Search’ folder under the Windows folder then right-click on the Windows folder and select New > Key and name the new folder ‘Windows Search’.
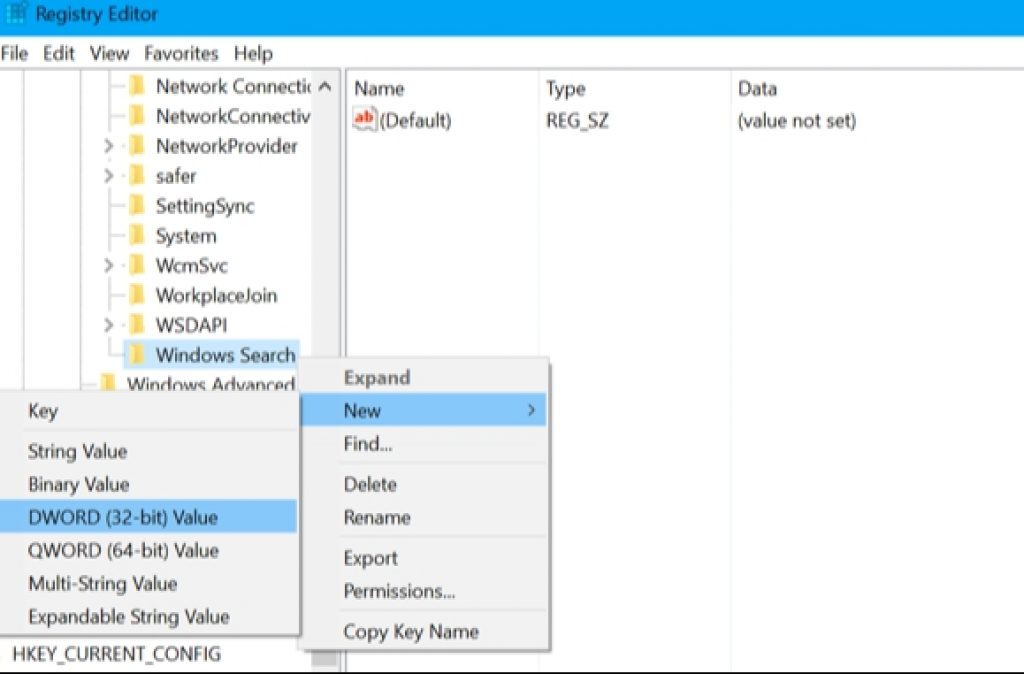
4 – Now right-click on the ‘Windows Search’ folder in the left pane and select New > DWORD (32-bit) Value from the context menu.
5 – Name this Value “AllowCortana” and double-click on it to open the editor box. In the Value Data box, enter the value ‘0’ (zero) and hit OK.
If you change your mind later and want to restore Cortana then navigate to this same location and simply turn this value from ‘0’ to ‘1’.
That’s all. You can successfully disabled Cortana on Windows 10 Home edition running latest anniversary update.
How To Disable Cortana via the Registry Editor on Windows 10 Pro and Enterprise Editions
Users of Windows 10 Pro or Enterprise editions can disable Cortana after installing the Anniversary update from the Local Group Policy Editor. If your PC is on company network then inform your admin first before making any changes in order to avoid later trouble at work.
You should also create a system restore point on Windows 10 PC, although Windows 10 Anniversary update automatically creates a system restore point, but you can also do so manually. This will make it easy to roll back to the previous working version of Windows 10 if anything goes wrong during the cortana disabling process.
Steps to Disbable Cortana on Windows 10 Pro and Enterprise Editions
1 – Press Windows + R keys to open the Run command box and type ‘gpedit.msc’ and hit enter.
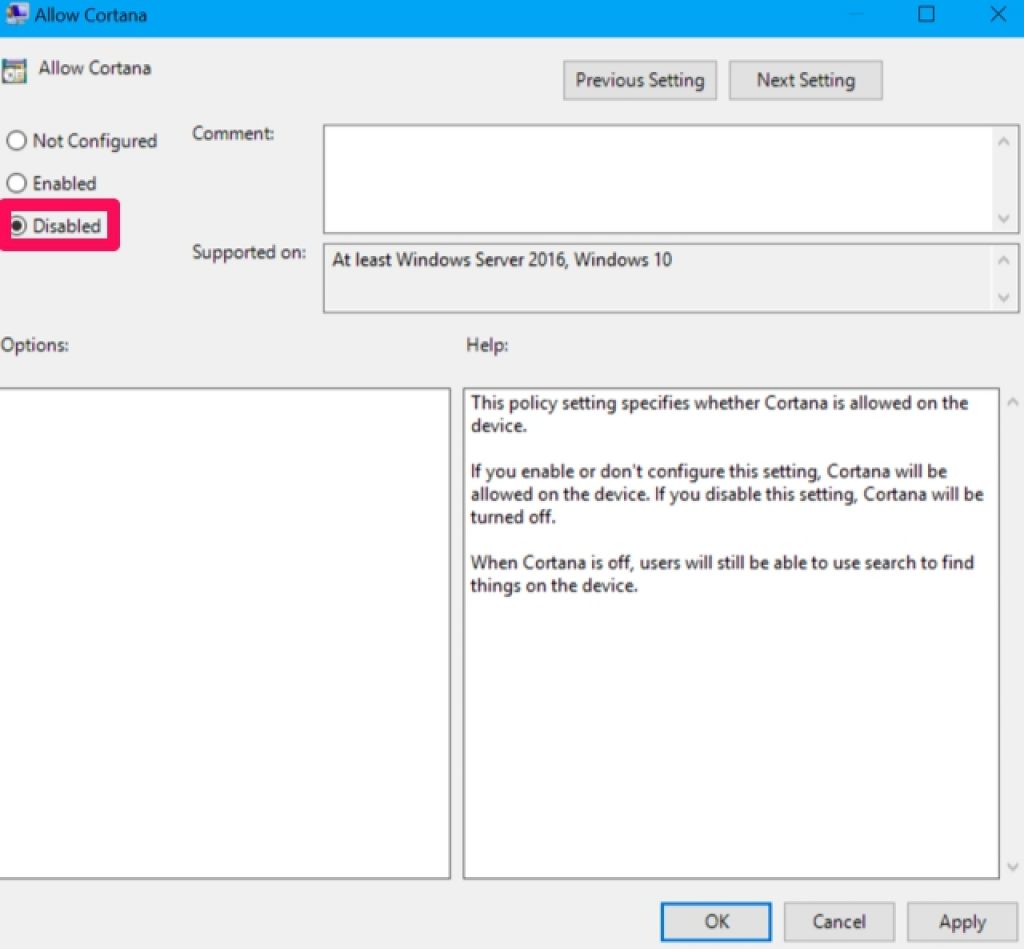
2 – Find the “Allow Cortana” setting and double-click on it.
3 – Disable the “Allow Cortana” option and hit OK.
4 – Close the group policy editor and restart the PC for changes to take effect or you can sign-out and sign-in again.
That’s all. To enable Cortana again, double-click the ‘Enable Cortana’ setting and change to ‘Enabled’ or ‘Not Configured’ option depending on your PC type. Did you find the guide useful, let us know in the comments section below.
For More on Appsforwin10, See:
How to Change Default Cortana Search to Google on Windows 10
10 Best Cortana Features for PC
How to Remove Windows 10 Cortana Errors


