Starting from Windows 10 version 1803 or later, users can make adjustment in the Settings app to set multiple display languages on their desktop PC, laptop, Surface Pro and tablets. This new feature will come handy especially for those who understand more than one language. So now you can use multiple language on Windows 10 by making a few simple changes in the default Settings app. In this tutorial, you’ll learn how to add a new language, set a new language as your default, and manage language settings on your Windows 10 device.

Microsoft has made it easy to use multiple language and use them side-by-side. This new tweak about the way Windows 10 language settings work would be really helpful for non-English speaking users, who prefer their native language to understand things better.
This allows you to change your default language to anything your think will be suitable for a certain app, website, and Windows feature like File Explorer, Settings, and others.
In the guide below, we are going to show the easy way to install additional languages, set a new language as your default, and change its settings on devices running Windows 10 version 1803 (Redstone 4) and later.
How to add a new language on PC Windows 10
1 – Open the Settings app.
2 – Click on Time & Language.
3 – Click on Region & Language.
4 – Under “Languages”, there is a sub-heading “Preferred Language” and right below it is a plus (+) button. Click on it.

5 – Now select your preferred language choice from a list. Starting from Windows 10 v1803, you’ll see option next to each language, such as Display language, Text-to-speech, Speech recognition, Handwriting.
Note: As you type the language name in search, you’ll sea a link to the Microsoft Store to get more language, in case you don’t find the language package you are looking for.
6 – Once done, hit the Next button.
7 – You’ll then see an “Install language features” box. Here you get additional options which you want to use with your selected language. If you do not want to set it as your new default language, uncheck the “Set as my Windows display language” option box.
8 – Now click on the Install button.
9 – All done.
Wait for the required packages to download and install on your device.
How to set a new language as your default on PC Windows 10
1 – Go to Settings.
2 – Click on Time & Language > Region Language.
3 – Under “Languages,” click on the Windows display language drop-down menu to select the display language for features like Settings and File Explorer. This settings item will change the language if you only want to change for preference for apps and websites.
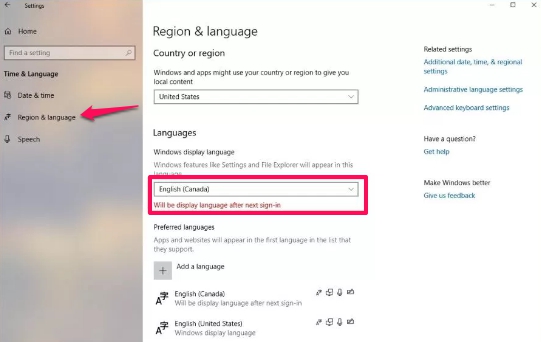
Once the required steps are complete, its done. Now sign out and sign back into Windows 10 for changes to take effect. If you wish to change the preferred language only for apps and websites, do not change the “Windows display language” settings, just use the up-arrow button to move the language you want to the top of the list in order to set it as a default Windows 10 language.
How to configure language on Windows 10 using Settings
1 – Open Settings.
2 – Go to Time & Language > Region & Language.
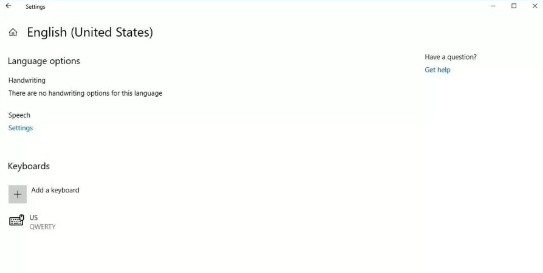
3 – Click the Options button.
4 – Here you get options to change the settings, such as Handwriting, Speech, Keyboard (to add a new keyboard layout).
All done. You have now learnt how to use amazing new language features on Windows 10 1803 and later versions. If you do not see these add and switch languages on Windows 10 settings, this is because your device isn’t running on the compatible version 1803 or later. So update your operating system before you can use multiple languages on Windows 10.