Windows 10 displays wrong time if the time zone is not properly set on it. This could cause confusion for frequent travelers who have to move from country to country on work related assignments with the disastrous impact on work schedules and notes linked to Windows 10 system clock and calendar. You may also find automatic time zone setting on Windows 10 useful during holidays in a different country or region. Here is a guide on how to configure time zone on Windows 10 and how to set it right if your system is showing incorrect time and region.

Windows 10 automatically configures and sets time zone at the time of new installation on computer. The new Windows OS is quite accurate when it comes to detecting location of the device using settings. However, this automatic time zone settings can show incorrect time when you travel to place with a different time zone. So how to set Windows 10 to automatically detect and show accurate time zone and local time without having to change it manually every time you go to a new place? Here is a guide for all of you looking for its answer.
In Windows 10, there are a number of ways to change the time zone on your computer. From the new Windows 10 Settings app, you can even set the OS to automatically set the local time zone.
In this tutorial, we are going to show you the process to set the correct time zone on your Windows 10 computer from Settings and Control Panel.
How to Configure Time Zone on Windows 10 Manually
Here are the steps to change the time zone from the Settings app on a Windows 10 device.
1 – Go to Settings.
2 – Click on Time & language.
3 – Click on Data & Time.
4 – Click on the ‘Time Zone’ drop-down menu to select the correct time zone.

5 – All done. Windows 10 will now use the time zone that you just set on your computer.
How to Configure Windows 10 to the Correct Time Zone Automatically
Above was the manually method that requires users to manually change the time zone every time they are in a new place. But you can save yourself time by settings Windows 10 to automatically change time zone whenever you go to a new place.
1 – Open Settings.
2 – Click on Time & Language.
3 – Click on Date & Time.
4 – Enable the Set time zone automatically option by turning the toggle switch to ON position.

5 – All done.
Once the option is enabled, the Time Zone area will be grayed out and Windows 10 will automatically set time zone based on your current location.
How to Configure Time zone from Control Panel
In this Windows 10, just like in older Windows 8/8.1/7, you can use control panel to set time zone as well.
1 – Open Control Panel.
2 – Click on Clock, Language, and Region.
3 – Click on Change the time zone link.
4 – Select the correct location time for your location.
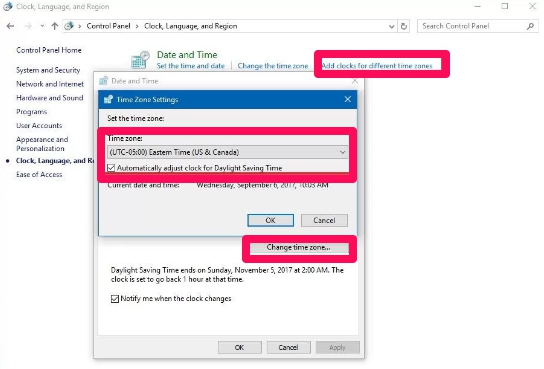
5 – Hit OK button when done.
6 – Click Apply and OK button to close control panel and let the changes to take effect.
7 – All done.
Your Windows 10 PC will now use the correct local time zone of your physical location. There is also an option to set the system clock to adjust automatically for Daylight Saving Time.