If your Windows 10 computer is running low no storage space or you need more free space for installing new stuff, then you might want to consider removing unused older apps from your device. In this tutorial, you will learn how to delete files older than X number of days automatically on Windows PC. This way you won’t have to manually search rarely used, or unnecessary applications, for removing them from Windows 10 computer. Follow the guide below to see how you can easily free up space and keep system organized by configuring Windows 10 to delete files that are older than a certain number of days automatically. This can be used to get rid of files from any Windows 10 folder.
In Windows 10, you can use the Task Scheduler and a command to automatically delete files older than a certain number of days. This is a useful trick to make sure that you never run out of storage space on your desktop PC or laptop. It also ensures that older files do not end up cluttering the system and keep things working smoothly.
Microsoft now offers a Storage sense option in the Settings app. Once configured, this feature starts automatically when your device runs low on storage space. Beside the option to delete temporary files, this feature can also be used to delete files that have been in the recycle bin or download folder that haven’t been changed in the last 30 days. However, the feature lacks the option to recognize additional folders to delete files that haven’t changed in the last month.
Temporary files downloaded from the internet or moved from different folders, it is possible to use the ForFiles command and the Task Scheduler to remove files from any folder that are older than a specific number of days.
In this tutorial, we are going to show how you can delete files that are not modified in X number of days, and then create an automated task that will delete files older than a certain number of days in any Windows 10 folder.
Note: Before running the command on the folder you want to cleanup, make sure to test the command using a test folder, as specifying the wrong parameter can cause to delete the wrong files.
How To Delete Files Older Than A Certain Number of Days on Windows 10 By Using ForFiles Command
Following steps show how to use the command for cleaning up different folders with a lot of files that are older than X days:
1 – Click Start.
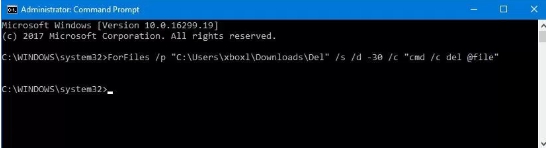
2 – Search Command Prompt and right-click the result and select Run as administrator.
3 – Type the following command to delete files that haven’t been modified in the last 30 days and hit enter:
ForFiles /p “C:\path\to\folder” /s /d -30 /c “cmd /c del @file”
In the above command, change the “C:\path\to\folder” by specifying the path to the folder that you want to delete files, and change “/d -30” to select files with a last modified date.
ForFiles Command Meaning:
- /p – pathname to start searching
- /s – tells ForFiles to search inside subdirectories
- /d – specifies the last data of file modification
- /c – tells ForFiles to run command (should be inside double-quotes) – default command is “cmd /c del @file”.
To get more information about the various switches, use the ForFiles /? command.
How To Delete Files Older Than X Days on Windows 10 Using Task Scheduler
The above method allows you to delete files in a folder that are older than 30 days. But it requires you to open command prompt and type the command accurately every single time to free up space.
If you are not comfortable with the manual method, then check out the automatic Task Scheduler method on Windows 10 to create a task that executes the command at specified intervals on its own.
1 – Open Start.
2 – Search Task Scheduler and click on it.
3 – Right-click the Task Scheduler Library folder.
4 – Click New Folder.
5 – Give the folder any name you want and hit OK. Create a new folder to properly organize tasks and separate them from the system tasks.
6 – Right-click the recently created folder.
7 – Select Create Task.
8 – In the ‘Name’ box, type a name for the task.
9 – Now, in the ‘General’ tab, under the ‘Security options’ section, select the Run whether user is logged on or not option. This is to prevent the command window from opening every time the task runs automatically in the background.
10 – Keep the Do not store password option unchecked.
11 – Next, go to the ‘Triggers’ tab and click the New button.
12 – Under ‘Settings’, specify when you want to run the task (daily, weekly, monthly). Whatever option you choose, make sure to specify the Start settings on the right side and hit OK button.
13 – Head over to the “Actions” tab, and click the New button.
14 – Click drop-down menu, and select Start a program.
15 – Under ‘Settings’, type the following command:
ForFiles
16 – In the ‘Add arguments’ box, type the following command and hit OK button:
/p “C:\path\to\folder” /s /d -30 /c “cmd /c del @file”
Make sure to change “C:\path\to\folder” in the above command to specify the path to the folder from which you want to delete files, and change /d -30 to select files with a last modified date.
17 – Go to the ‘Settings’ tab and check the following options:
- Allow task to be run on demand.
- Run task as soon as possible after a scheduled start missed.
- If the task fails, restart everything.
18 – Hit OK button.
19 – Enter admin username and password and click OK.
Once done, the command will automatically run on the scheduled date and time to delete the files in the location that are older than the number of specified days. Do not change the folder name or move it to another location, otherwise the task will have to be repeated for the new name or location.