In this guide, we are going to show you how to activate and configure Controlled folder access anti-ransomware features on Windows 10. You can now activate a new Windows Defender Antivirus feature that protects your device data from ransomware cyber attack. We also shared a more detailed guide on how you can prevent ransomware from attacking your computer, refer to it for further information and also use this tutorial to use built-in Windows 10 feature to protect your data from cyber attack.

As you might know that Windows Defender Antivirus is default security tool that comes with all Windows 10 editions to protect your device against viruses, malware, spyware, cyber attacks, and other types of malicious malware, such as ransomware. Windows Defender has come a long way since its initial days so much so that you don’t need third-party antivirus tools to protect your system when its activated. It keeps your online activities safe from hacker attacks, however, starting from the Windows 10 Creators Update, Windows Defender Antivirus now has a new Controlled folder access feature specially designed to tackle harmful threats, programs, and ransomware attacks.
This new ‘Controlled folder access’ feature keeps track of all the modifications that applications make to your files. So, if an app tries to change the files located inside a protected folder, it will get blacklisted, and you’ll receive a notification about that unauthorized activity before it can do irreversible damage to your system files.
In the guide below, you are going to learn how to enable and configure Controlled folder access in Windows Defender Antivirus on Windows 10 PC desktop and laptop.
How to Enable Windows 10 Controlled Folder Access in Windows Defender Antivirus
By default, Controlled folder access comes disabled on Windows 10, here are the steps to activate it manually:
1 – Go to Windows Defender Security Center.
2 – Click on the Virus & threat protection option on the left window pane.
3 – Turn the toggle under Controlled folder access to ON position.
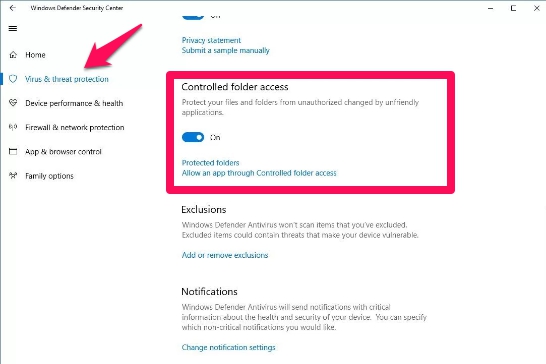
4 – All done.
When this feature is enabled, Windows will start monitoring all protected folder on your device and notify you on the spot if app/apps try to make changes to them.
How to Allow Trusted Apps on Controlled Folder Access
Controlled folder access feature understands which apps are allowed to make changes to trusted folder with your prior permission. But sometimes even trusted apps can get blocked from accessing and modifying protected folders by Controlled folder access feature. In that case, you need to manually enable the particular app or apps by following the steps below:
1 – Launch Windows Defender Security Center in the Settings app.
2 – Click on Virus & threat protection.
3 – Click on the Virus & threat protection settings option.
4 – Click the Allow an app through Controlled folder access.
5 – Here, click on the plus (+) sign button saying Add an allowed app button to locate and allow the app you like.
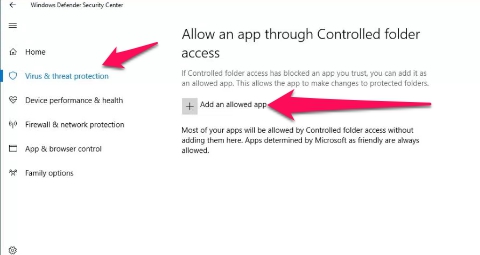
6 – All done.
How to Add New Folder Locations in Controlled Folder Access
When you enable the Controlled folder access feature it protects the Documents, Pictures, Movies, and Desktop folder by default. You can choose to add or remove these folders or add more locations to the list for active monitoring by the Controlled Folder Access feature against ransomware and other harmful malware attacks.
1 – Go to Windows Defender Security Center in Settings.
2 – Click on Virus & threat protection.
3 – Click the Virus & threat protection settings.
4 – Click the Protected folders link.
5 – Click the Add a protected folder button to find and select the folder location you wish to add to the list.
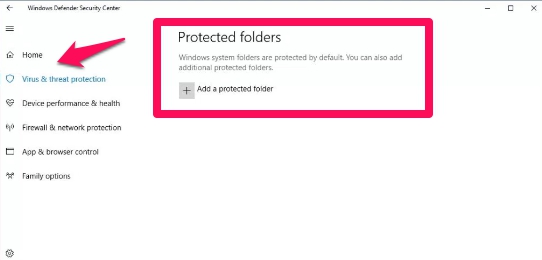
6 – All done.
Remember, this Controlled folder access feature is available from Windows 10 Fall Creators Update or later updates, so if you don’t see this option in Settings app it’s because you haven’t installed the Creators Update yet, which you can do so manually as well, if you don’t want to wait for the official OTA Update from Microsoft, by following the instructions in this link.