Windows 10 Start Menu is a very useful feature that helps users manage apps, files and folders on desktop PC, laptop or tablet quickly than was possible in the previous Windows versions. Here you are going to learn easy way of grouping start menu files into folders so that you can access more apps from a single place and keep Start menu from getting cluttered. Windows 10 offers this great way to personalize start menu and organize tiles on it. Let’s check out how to use this feature on Windows 10 device.
Microsoft is working on some great new improvements in the Start menu on Windows 10 that will be with us in the upcoming Windows 10 Creators Update, most likely in April. Windows 10 has increased the usability of the Start menu by adding the feature of creating folders on it. If you are using a test version of the Windows 10 Creators Update, then follow the steps below to group tiles in folders for quickly accessing them on Windows 10. Even if you don’t have Windows 10 Creators update installed on your device you can use these instructions when the update gets released in April.
With Start Menu Tile Folders, you can organize and personalize tiles on Windows 10. This feature is not new, Microsoft first brought this feature in Windows 10 Phone but now the company is offering the feature on all Windows 10 versions across devices to streamline the experience.
How To Create Tile Folders On Windows 10 Start Menu
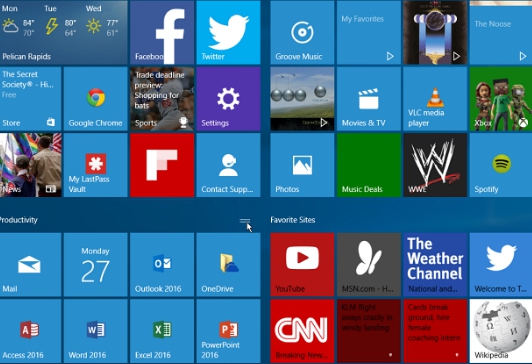
The really very easy to create a new folder in the Start menu. All that’s required is for you to drag and drop a tile on top of the another tile in the start menu to create a new folder.
Repeat the same drag and drop process to create any number of folders on Start menu.
There is no restriction as to the number of tiles you can add in a folder. Moreover, you can group folders in one single folder on Start menu as well.
When created, you will see a small icon the for each tile in that folder in order to make it easy for you to see what’s in that group of tiles without having to first open the folder and then click on the tile. Thus, saving you an extra click.
Moreover, you can change the size of the folder in a group if the number of tiles are too menu. Just right-click the folder, select resize and click on the tile size you wish to set for that folder.
If you changed your mind, then simply remove all or certain tiles from the group, or complete delete a tile folder from the Start menu.
All done. This feature presents a handy way of managing start menu. You can clear the tile clutter while using more tiles than was possible before on Windows 10. Do remember that this feature is available only on Windows 10 Creators Update, which is still be beta testing phase on Windows Insider Program, but will soon be available for everyone starting from April.
Also See on Apps for Windows 10:
How To Add Frequently Used Folders On Windows 10 Start Menu For Quick Access
How To Fix Keyboard Not Responding In Edge Browser & Start Menu On Windows 10
How To Fix Start Menu and Cortana Not Working Error in Windows 10
How To Mend Crashing Windows 10 Start Menu
Fix 0x80240014 Error When Installing Apps From Windows Store