Here is the guide for you to learn how to upgrade Windows 10 32-bit to 64-bit version. If your PC has a 32-bit Windows 10 version then its likely that you are missing out on amazing features of 64-bit version. Use this guide to upgrade to the 64-bit version to take advantage of advanced productivity features. PCs running on genuine copy of Windows 7 or Windows 8.1 can upgrade to free Windows 10 copy from Microsoft. Just like previous Windows version, Windows 10 comes in both 32-bit and 64-bit versions.
Although upgrading from Windows 10 Home to Windows 10 Pro is not free, but what many don’t know is that you can upgrade from Windows 10 32-bit version to 64-bit version for free.
However, you can only upgrade an original Windows 10 version to its equivalent edition on the same PC architecture. It means that if your PC has a 32-bit version of Windows 8.1, you can upgrade to only Windows 10 32-bit version – despite your PC processor is capable of running a 64-bit version. You can get this issue solved by making a clean Windows installation and restructure Windows settings and apps.
This Windows 10 guide will take you through the process of finding out whether your PC is eligible for a 64-bit version upgrade and then how to upgrade Windows 32-bit to 64-bit version.
Find Out if your PC is Compatible with Windows 10 64-bit version
A Windows 10 64-bit version runs only on PCs with sufficient hardware to support the advanced version. Here is how to find out if your PC is capable of handling 64-bit version or not.
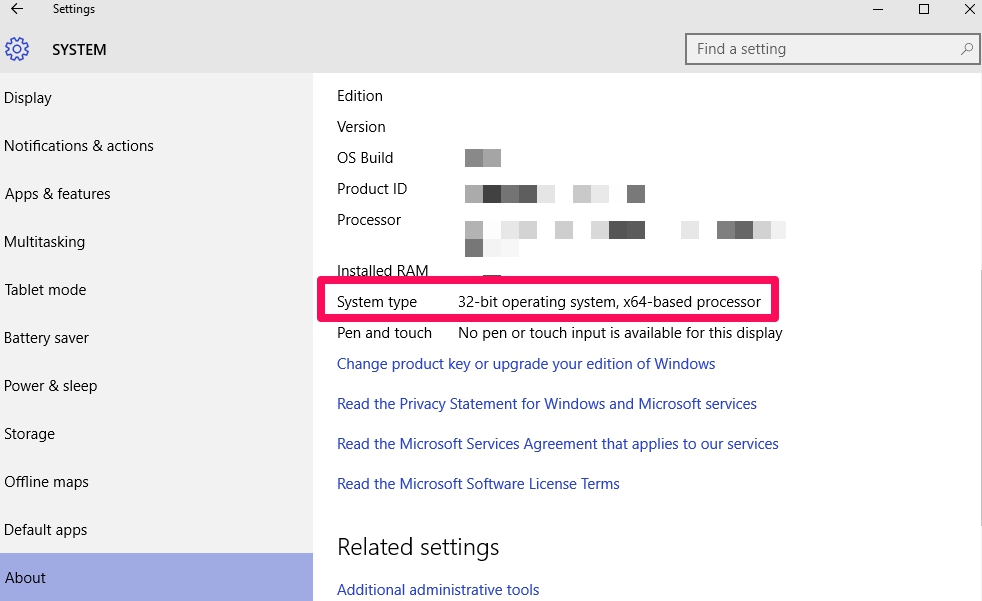
1 – Open Settings app, press Windows + I keys on keyboard to directly open the Settings app.
2 – Click System and then About.
3 – See System Type option on the list, if it says 32-bit operating system, x64 based processor, then it means that your PC is on Windows 10 32-bit version but is capable of running 64-bit version as well. But if ‘System Type’ option says, 32-bit operating system, x86 based processor, then your PC is incompatible with the 64-bit version.
You can also find processor information from the System Information window.
1 – Open the Start Menu and type system information and hit enter.
2 – Under System Information, on the right window pane see System Type on the list. If it says x64-based PC, then your PC can run a 64-bit version of Windows 10. If you see x86-based PC then your PC is incompatible with 64 bit version.
Most advanced PCs run both 32-bit and 64-bit versions, if you are using older PC then its better that you first check processor status before following instruction to upgrade to the 64-bit version from the guide below. Official Microsoft support page says that any PC with Windows 8 or later needs to have a processor with No-eXecute (NX), Physical Address Extension (PAE) and Streaming SIMD Extensions 2 (SSE2). Windows 10 64-bit requires CMPXCHG16b (CX16) features on processor.
Every time you install Windows on PC, the setup Wizard checks for software compatibility before the installation begin. If the processor lacks following feature, Windows won’t install on PC.
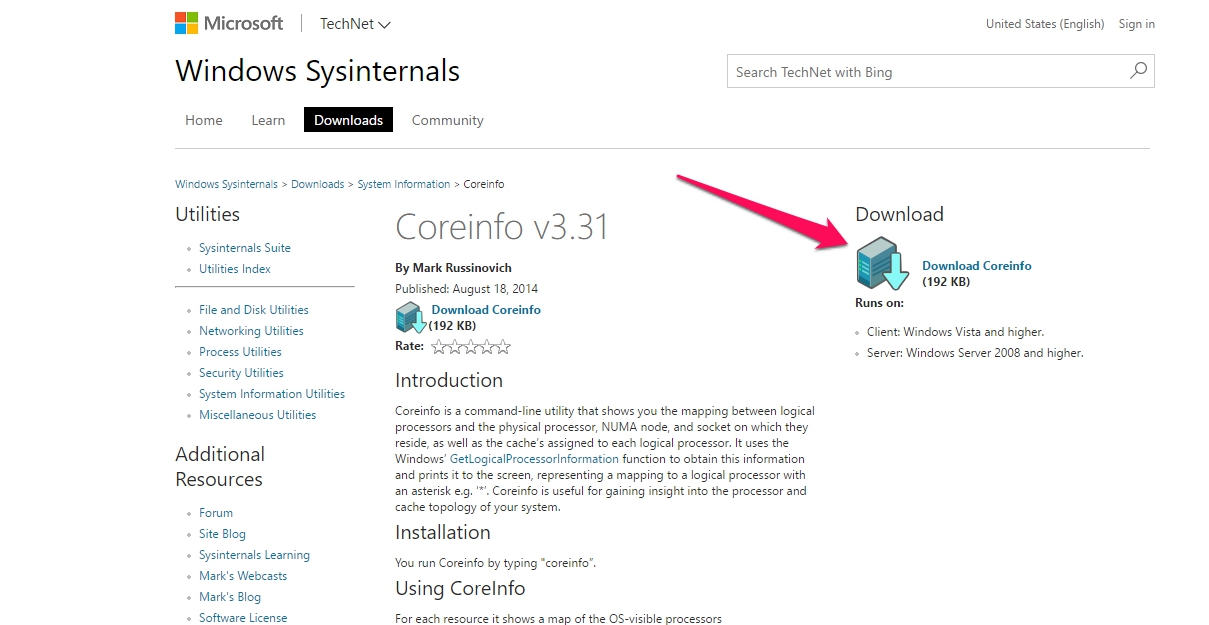
In order to verify that your PC supports features, use Microsoft’s Windows Sysinternals Coreinfo command-line tool.
1 – Download Coreinfo from Windows Sysinternals.
2 – Extract the downloaded zip folder.
3 – In Coreinfo folder, click on File and Open command prompt.
4 – Type ‘coreinfo’ in the command prompt and hit enter.
5 – You will processor information on Coreinfo, make sure NX, PAE, SSE2 and CX16 are there on the list. (Press Ctrl+F shortcut to open the find command to directly search for the four processor elements.)
Update Drivers:
After this, make sure that video, sounds cards and other drivers are compatible with Windows 10 64-bit version. Relatively newer PCs have 64-bit drivers installed on them, however, some older components may not be present. Also upgrade to 64-bit drivers from manufacturer’s website before upgrading Windows 10 version.
Create Full PC Backup:
As this process involves makes quite a few changes to the PC system, its better that you backup entire PC data before proceeding to save data against loss or damage during the process.
See how you can make full image PC backup on Windows 10.
Also, backup personal files, folders, images and other data to external storage device or OneDrive as they will be deleted during the process.
Clean Install Windows 10
You cannot directly jump Windows 10 32-bit version to 64-bit version, for that, you will have to go through clean installation of the operating system.
Before clean installation, make sure your Windows 10 copy is fully activated. Check it from Settings > Update & security > Activation
Make Windows 10 Installation Media
1 – Open Microsoft’s Windows 10 download page.
2 – Connect USB flash drive with PC.
3 – Click the Download tool now button and save the Media Creation Tool on PC.

4 – Double-click the MediaCreationTool.exe file and hit Accept.
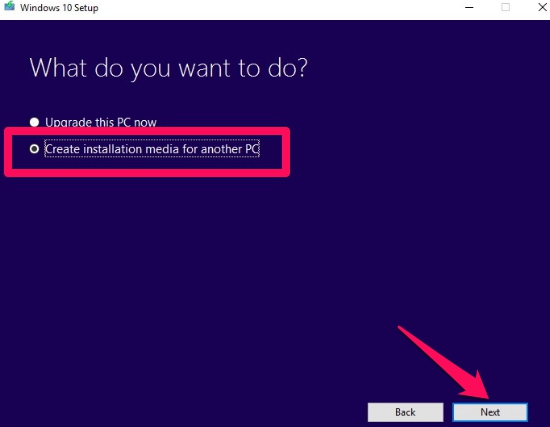
5 – Now select the Create installation media for another PC option and hit Next.
6 – Uncheck the Use the recommended options for this PC option.
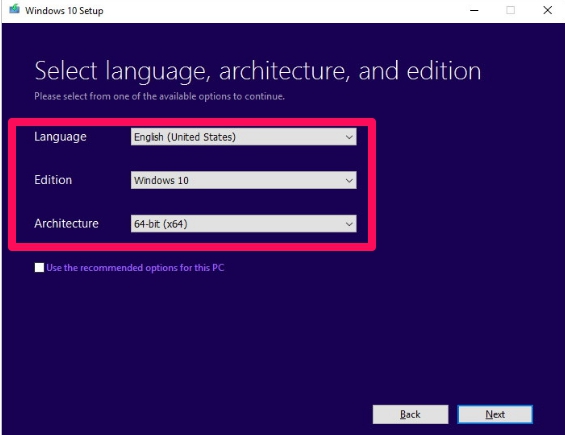
7 – Now select the Language, Edition, and Architecture on the setup window and hit Next.
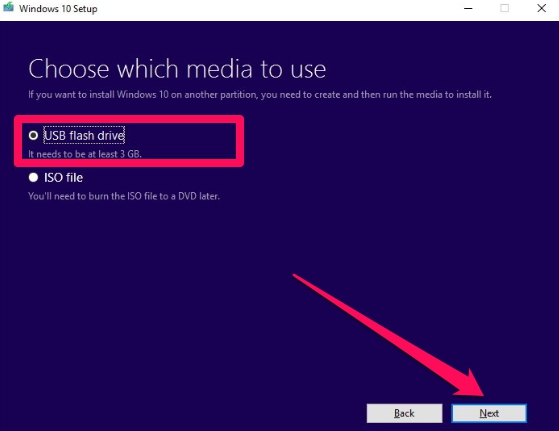
8 – Select the USB flash Drive option and hit the Next button.
9 – Select the removable drive from the list and hit next.
10 – After creating the installation media, close media creation tool window.
Install Windows 10 64-bit version on PC:
1 – Restart the PC to begin Windows 10 64-bit installation. Keep installation media connected with computer.
2 – Open the Windows Setup, click Next and then Install now.
3 – You do not need to enter Windows product key, if you already have an activated version installed.
4 – Accept terms and conditions and hit the Next button.
5 – Click the Custom: Install Windows only (advanced) option.
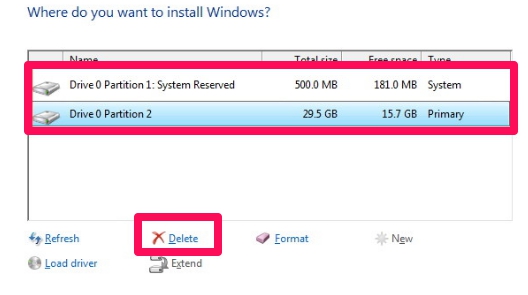
6 – Select and delete system partitions – in this case – Drive 0 Partition 1 and Drive 0 Partition 2.
7 – Click Next and follow on-screen instructions as prompted.
After completing the installation, go to Settings > Update & security > Windows update and download latest updates and drivers for the new 64-bit version. Check Microsoft’s as well as PC manufacturer’s websites to download latest drivers.
Now you can restore data from the previous version which you saved in the backup prior to upgrading to the 64-bit version.
Wrap Up
There is not much difference between Windows 10 32-bit and 64-bit versions. Only thing that separates the two sides is that you get more productivity features in Windows 10 64-bit version. In the 64-bit version on PC with at least 4GB RAM, you can run more apps simultaneously than in 32-bit Windows 10 version. Google Chrome which is known for eating massive amount of RAM on PC, even Chrome runs smoothly without slowing down the PC while running multiple tabs.
This method works on Windows 10 version only. Any attempt to upgrade Windows 7 32-bit to 64-bit or on Windows 8/8.1, XP/Vista, won’t work since Microsoft doesn’t support similar change for the older operating systems.
See More on Appsforwin10:
Top 5 Best Antivirus for Windows 10
How to Play Pokemon Go on Windows 10 PC via BlueStacks – [Game-play and Battery Saving Tips & Tricks]