Windows allows you to turn PC into a WiFi hotspot. Here is a guide for you to know how to share wired or wireless internet connection in Windows 7, Windows 10 & Windows 8/8.1 from PC desktop or laptop with other wireless devices. Methods is slightly different for the three windows types, so we will mentioned them one by one separately in the guide below for you to understand it better. With the guide you will be able to share internet connection from Windows PC with other wireless devices around and for sharing internet from your PC Windows, you must first turn it into a WiFi hotspot.

Turn PC into a WiFi hotspot – Quick Method
Hey folks, before moving on the detailed guide for manually setting your PC Windows as WiFi hotspot, why not use a reliable third-party tool to help you accomplish the same task automatically. Those who can’t get built-in Windows WiFi hotspot feature to work properly can use Connectify Hotspot tool – this WiFi hotspot package comes with many options and user-friendly interface.
Connectify hotspot tool saves you ton of money, especially when travelling via planes, buses, trains or any mean of transport that charges extra for WiFi connectivity or staying at hotels that charge per device. With the Connectify Pro version you can use your PC as a WiFi repeater or a wired router, or share a tethered connection off your phone. You can try the basic version for free but with limited features
How to Share Wired Internet Connection in Windows 7 (32-bit/64-bit) PC
In Windows 7 there is an ad-hoc networking interface that helps you to share your PC’s wired internet connection to wireless devices. An Ad-hoc network is simple, direct network connection between devices. Instructions below will enable you to create an ad-hoc network between your PC’s wireless connection and any wireless device you want to share internet connection with. All you need is to make sure that the wired connection is set up on your PC and that the PC has WiFi.
One important thing to note when setting up an ad-hoc network using PC’s WiFi, it will disable any existing connection that uses WiFi adapter. That’s why make sure your PC internet connection is linked with an Ethernet sources. Here is how:
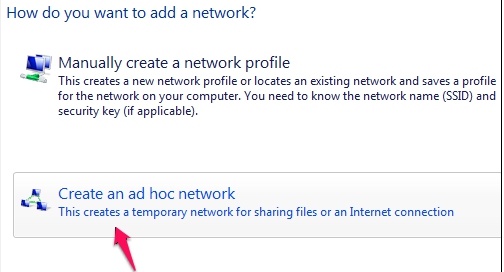
- Open the Manger Wireless Networks window on Windows 7 PC (click Start and search for this window on PC).
- Now click the Add button.
- Next, click the Create an ad hoc network.
- Enter your username and password for the network to make it appear in the list of wireless networks.
- Now select this option to disconnect your PC from current WiFi network and start hosting an ad-hoc network which other devices can connect to and access internet.
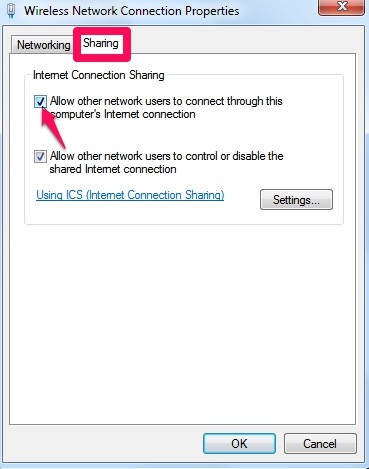
Don’t forget to enable ‘Allow other network users to connect through this computer’s internet connection’ option in Wireless Network Connection Properties sharing tab to allow you PC to share its internet with devices connected to your PC over the ad-hoc network.
How to Share Wired Internet Connection in Windows 8 (32-bit/64-bit) PC
Process of setting up ad-hoc network is not as straight forward as it is on Windows 7 or Windows 10 because it doesn’t have the graphical interface to enable ad-hoc network on PC. Although the feature is still present in Windows 8 but to enable it you will need to enter some commands for both 32-bit and 64-bit versions of Windows 8 PC. Here’s how:
- First and foremost, make sure that your existing wireless network is being shared with other network users.
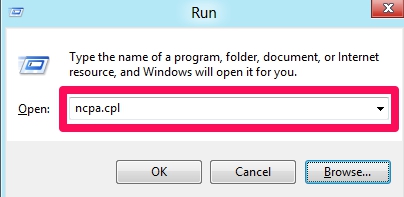
- Now press Windows + R keys to open the RUN dialog box and type ncpa.cpl and hit enter.
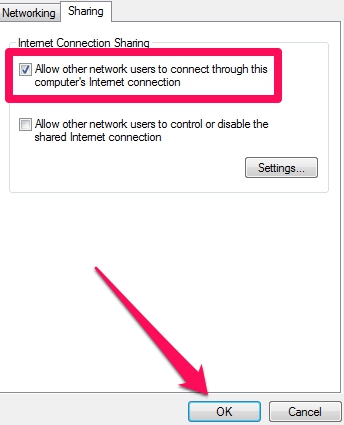
- Right-click on your Wireless Network icon in the Network Connection Window and select Properties from the context menu.
- Click on the ‘Sharing’ tab on Network Properties dialog box and enable the ‘Allow other network users to connect through this computer’s internet connection’ option. Make sure the option below it is unchecked and hit the OK button.
- Open the command prompt with admin privilege. Hit Windows + X keys and select ‘Command Prompt (Admin)’ from the Power User menu.

- In the command prompt, setup the wireless network by typing the following command:
netsh wlan set bostednetwork mode=allow ssid=”<SSID>” key=”<PASSWORD>”
<SSID> is the name of your network and <PASSWORD> is the password you want users to connect with. The access point is created with WPA2_PSK (AES) encryption.
- Now start broadcasting network by typing the following command:
netsh wlan start hostednetwork

- If you want to see the details about the network in the form of basic list on the command prompt, type the following command:
netsh wlan show hostednetwork
This will show your connection channel, mode, SSID name, Authentication type, Radio type, Status, Number of Clients, maximum clients and other options.
When its done, you can now share your ad-hoc network to connect any WiFi device with your PC.
How to Share a Wireless Internet Connection in Windows 7 or Windows 8
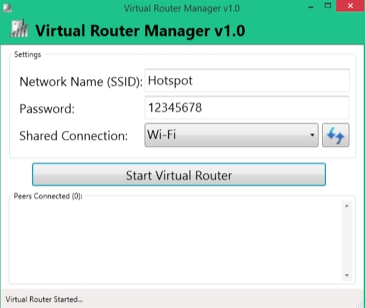
For sharing wireless internet connection from Windows 7 or Windows 8 PC desktop or laptop with other wireless devices, we highly recommend that you use Virtual Router tool WiFi Hotspot tool. You can also share wired network with this tool without needing to create an ad-hoc network first.
Download Virtual Router tool and setup on Windows 7/8. Using this tool is as easy as pie, just type in the name of your network, enter password, and select the network that you want to share with devices that connect with WiFi network. Click the ‘Start Virtua Router’ button and you are good to go. It also provides a list of connected devices.
How to Share a Wired or Wireless Internet Connection in Windows 10
In Windows 10 Anniversary Update, Microsoft has made it easy to turn PC into WiFi hotspot. With a single switch, you can turn PC with WiFi connection into a hotspot. You can share both wired and wireless internet connection from one Settings window.
- Press Windows + I keys to open Settings in windows 10 or open Settings from the Start menu.
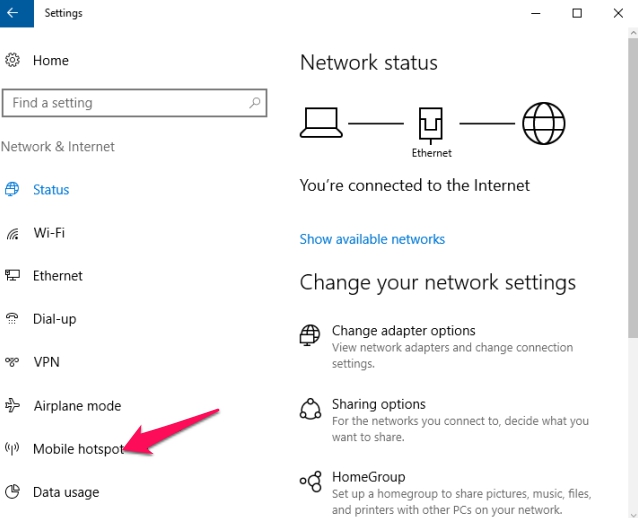
- In Settings, click Network & Internet.
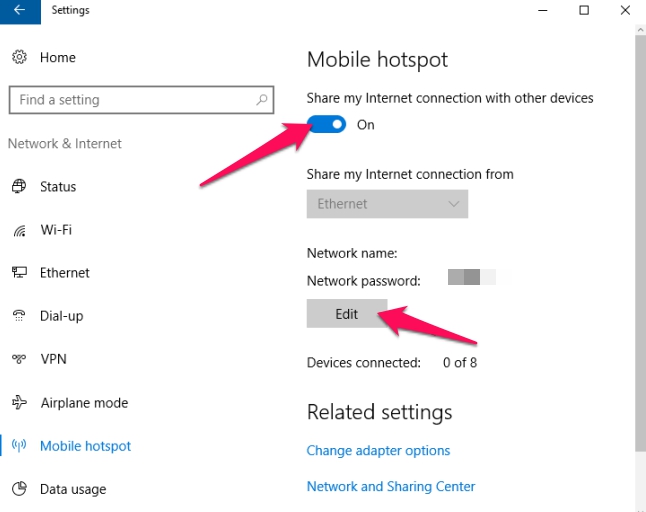
- On the left window pane in Network & Internet screen, select Mobile hotspot option.
- On the right window pane under Mobile hotspot, turn ON the ‘share my internet connection with other devices’ toggle. You can click on the Edit button to use non-default username and password. Type any username or password for network sharing.
That’s all. You have enabled internet connection sharing on Windows 10, its as easy as that on new Windows 10 OS, which is why we recommend users of Windows 7 and Windows 8/8.1 to immediately upgrade to Windows 10 as it offers many easy to use features and quick functions compared to older window version.
Enabling WiFi hotspot on Windows 10 is way more easy than in Windows 7 or Windows 8. But with instructions in the guide above, you can get it enable on older Windows versions as well. You can also use third-party apps for turning PC into WiFi hotspot. So now you can use your PC to share internet with wireless devices.
For more on Appsforwin10, Read:
Psiphon 4 (2016) Free Download for Windows 10/7/8/8.1 PC & Laptop
Top 5 Best VPN Services for PC Windows 10